Creating 3D environments in Blender

This fresh, new Blender 3.2 course update (Version 3.0) contains valuable information for anyone looking to build 3D Environments. If you are new to Blender, it explains all the basics, teaching everything from grass to building creation, from scratch. If you’ve used Blender 2.81, this brand-new course highlights all the new Blender 3.2 features you can use to create amazing 3D environments.
Create beautiful 3D environments
Creating 3D environments is now more popular than ever, with a growing number of people mastering the skill of 3D crafting. Whether you are just starting out or already quite experienced, creating 3D environments can be a time-consuming and complex craft. During my 15 years creating these environments, I have faced and overcome many challenges. Having discovered the beauty and joy of 3D crafting, I now love nothing more than sharing my passion and wealth of experience with others. I hope this course sets you on the path to designing your own dream environment entirely in 3D.
Learn everything from A to Z
When I started 3D modeling, the only learning source I had was a printed book on random modeling. For me, it was enough to learn the basics, but without guidance, it’s easy to get lost. Today, there are many online learning resources that offer a swifter path to success in this field. However, not all offer a complete A to Z on 3D crafting. That’s why this 3D environment course is especially designed to cover everything you need to know to create stunning environments.
Step-by-step guidance
Discover everything you need to know to create your own 3D environments. Even if you have never touched Blender before, this course offers step-by-step guidance to help you with the basics so that you can feel comfortable using the software.
With 30+ hours of video content, this course takes you from complete beginner to proficiency.
Best of all, it’s completely up to date. I developed the first version of this course in 2015 and I continually update and improve the content. In 2020, Version 2.0 covered the new Blender 2.8 UI, but the latest Blender 3.2 update meant it was time for another major overhaul. Version 3.0 has fully updated course material recorded in Blender 3.2, so you can follow along with ease.
What will you learn in this course?
· Blender basics, just enough to follow this course (fully documented with handbook)
· Creating grass (Geometry nodes )
· Creating trees (Geometry nodes )
· Building a ruined landscape
· Blending displaced materials
· Creating a river scene
· Creating a procedural sky with clouds
· Working with photo scanned structures
And much more!
What included in this course?
As always, I offer a course full of content, this time it’s bigger than ever. The course uses free content from the Polyhaven CC0 platform, which I started with Greg Zahl in 2018 to provide textures, models and HDRi’s for everyone to use. Simply go and pick the assets you like. A selection of 4K textures and models are included in the course, but feel free to download up to 16K from the Polyhaven platform.
You’ll also receive exclusive content you won’t find on Polyhaven:
· Photo-scanned rocks, tree barks, wooden beams, plants, ruins and a castle
· Photo references (landscapes, buildings, flowers)
· 125 pages of documentation for the introductory chapter
· All Blender scene files (Blender 3.2).
Chapter overview
Chapter 1: Course introduction
A short introduction what you will learn in each chapter. Also, some explanation about workflow and organization, motivation and inspiration and course related questions. (Now available)
Chapter 2: Blender basics
This chapter learns you the Blender fundamentals. If you are new to Blender, this chapter helps you on track with a quick introduction of the interface and viewport and some of the most used tools. We also build a simple table/chair scene and build a dice scene with geometry nodes. This chapter comes with 125 pages of documentation. (Now available)
Chapter 3: Creating a grass scene
In this chapter we start with making grass strands. We pack the strands in Geometry nodes and build a simple but realistic grass scene with the geometry Nodes system. We use proxy models to speed up the viewport and add some variation by modeling some flowers. In the end of this chapter, we animate the grass so you can render the scene in motion. (Now available)
Chapter 4: Creating a forest path scene
Big topic in chapter 4 is tree creation. We use photo-scanned barks in combination with generated branches. We add twigs on the branches with the geometry nodes and provide this with an animation. We upgrade the grass template by adding a path generator so you can simply adjust the scene by drawing a path. (Now available)
Chapter 5: Creating a ruined scene
In this chapter we use the grass template and trees from the previous chapter and spend most of the time on the ruin structure. We build an advance material node to blend a brick and plaster material. We also model some bricks and scatter these on the structure with Geometry nodes. (Now available)
Chapter 6: Farmhouse river scene
This course comes with lots of scanned rocks, this chapter is the ultimate scene to blend all the rocks to make a river scene. First we shape the terrain so we have a river bed. Most of the lectures cover the creation of the farmhouse. , this is the main structure of the scene. In the end of the chapter we scatter the river with rocks and animate the river. (Now available)
Chapter 7: Sunset castle scene
This time we use a photo-scanned castle and blend the structure with the terrain. We build a sky with volumetric clouds and use the Nishita skylight to blend the sky to create a sunset. (Now available)
Chapter 8: Mountain ruin scene
This large landscape combines all the best from all chapters. We use the grass, trees and path to create a mountain path. We fill the scene with scanned ruin structures and blend the sky with distance mountains.onderful environmental scene. All content and textures come from Texture/HDRI Haven and are included in the course. (Now available)
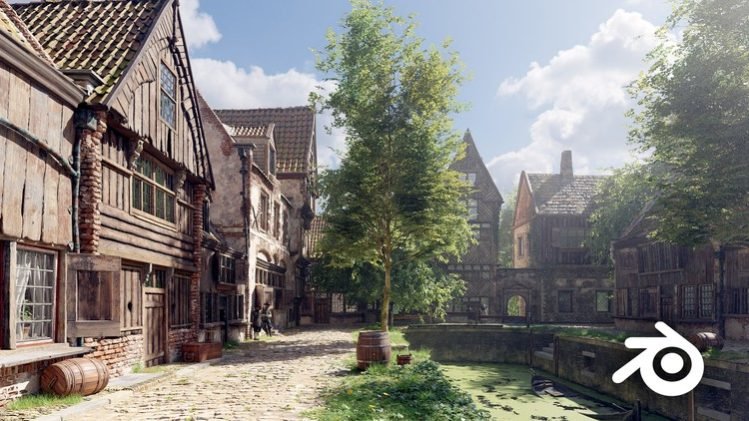
Chapter 9: Medieval urban scene
This chapter can be seen as a course in itself. This chapter contains the complete workflow to model a medieval street scene. This medieval scene is based on the original 2014 scene and was re-designed for this new 3.0 version of the course. (Scheduled March 1st 2023)
About me
My name is Rob Tuytel and I have been a environment designer for the past 16 years. I have a huge passion for the Dutch 17th century and mainly focus on medieval architecture. I am Co-Founder of Polyhaven together with Greg Zahl. I love to study old environment paintings and use these as an inspiration for my work. You might know me from the Tears of Steel open Blender movie or from my previous environment course for Blender 2.81.
Chapter 01 - Introduction (3.2)
Chapter 02 - Starting with Blender (3.2)
Chapter 3 - Creating grass (3.2)
Chapter 4 - Creating a forest path (3.2)
Chapter 5 - Ruine landscape (3.2)